If you’ve ever struggled with applying eyeliner and ended up with smudges or uneven lines, fret no more! This article is here to guide you through the dos and don’ts of mastering the flawless eyeliner look. From choosing the right type of eyeliner to achieving the perfect wing, we’ve got you covered. Say goodbye to smudges and hello to beautiful, well-defined eyes!

Choosing the Right Eyeliner
When it comes to choosing the right eyeliner, there are a few factors to consider. One of the most important factors is your eye shape. Different eye shapes require different techniques and styles of eyeliner application to enhance their natural beauty. For example, if you have almond-shaped eyes, a classic winged eyeliner look can help elongate your eyes and create a sultry effect. On the other hand, if you have round eyes, you may want to opt for a thin line and focus on elongating your lashes to make your eyes appear larger.
Aside from eye shape, selecting the right formula is also crucial. There are various types of eyeliners available, including pencil, liquid, gel, and felt tip. Pencil eyeliners are great for beginners as they are easy to control and provide a more subtle look. Liquid eyeliners are perfect for achieving precise, sharp lines, while gel eyeliners offer a creamy consistency that is ideal for smudging and creating smoky looks. Felt tip eyeliners combine the precision of liquid liners with the ease of use of a pen, making them a popular choice among beauty enthusiasts.
Lastly, finding the right shade is essential for enhancing your eyes and complementing your overall makeup look. The classic black eyeliner is always a safe bet and can add depth and intensity to any eye color. However, don’t be afraid to experiment with different shades. For example, brown or navy eyeliners can create a softer and more natural look, while metallic or colorful eyeliners can add a fun and bold element to your makeup. Consider your eye color, skin tone, and personal preferences when choosing the right shade of eyeliner.
Prepping Your Eyes
Before applying eyeliner, it’s important to prep your eyes properly to ensure a flawless and long-lasting application. Start by cleaning your eyes using a gentle cleanser or makeup remover to remove any dirt, oils, or residual makeup. After cleansing, moisturize your eye area with an eye cream or a lightweight moisturizer. This step helps to hydrate the skin and create a smooth canvas for your eyeliner.
Next, apply an eye primer to your eyelids. Eye primer helps to even out the skin tone, minimize the appearance of fine lines, and prevent your eyeliner from smudging or fading throughout the day. Gently blend the primer onto your entire eyelid, including the inner corners and along the lower lash line if desired.
To further enhance the longevity and intensity of your eyeliner, set a base with powder. Take a small fluffy brush and lightly dust a translucent or skin-colored eyeshadow onto your eyelids. This step helps to absorb any excess oils and provides a smooth surface for your eyeliner to adhere to.
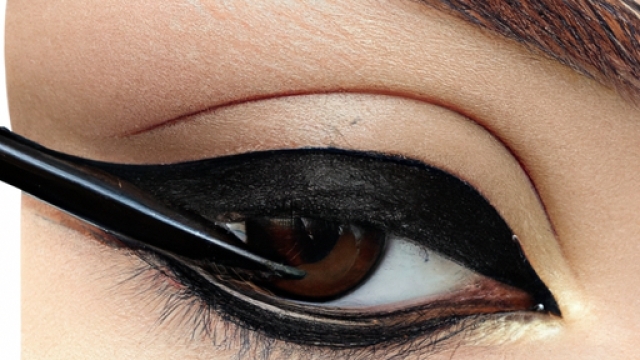
Dos for Applying Eyeliner
To achieve a flawless eyeliner look, there are several dos to keep in mind. Start by applying a thin line close to your upper lash line. Starting thin allows you to gradually build up the thickness and intensity of your eyeliner. Using short strokes instead of one continuous line will give you more control and help achieve a precise and even application.
When applying eyeliner, use a light hand to avoid tugging or pulling on the delicate skin around your eyes. Applying gentle pressure will ensure a smooth and comfortable application. When aiming for a bolder look, gradually build up the thickness of your eyeliner by layering and connecting short strokes.
For a more lifted and elongated appearance, focus on the outer corners of your eyes. Extend your eyeliner slightly beyond your natural lash line to create a subtle cat-eye effect. This technique can help make your eyes appear more almond-shaped and create a flattering, lifted look.
It’s also important to remember that different occasions call for different eyeliner styles. Experiment with different techniques, such as winged liner, smoky liner, or tight-lining, to suit the occasion and your personal style. Practice applying eyeliner to achieve precision and don’t hesitate to blend your eyeliner with eyeshadow for a seamless and polished finish.
Don’ts for Applying Eyeliner
While there are many dos for applying eyeliner, there are also don’ts that you should avoid to achieve the best results. One common mistake is tugging or pulling on the eyelid while applying eyeliner. This can lead to an uneven application and may cause discomfort or irritation to the delicate skin around the eyes. Instead, use gentle strokes and light pressure to achieve a smooth and comfortable application.
Another don’t is applying eyeliner in one stroke. This can result in a messy and uneven line, especially for beginners. It’s better to break it down into small, manageable strokes and gradually connect them to create a flawless line.
Avoid pulling the skin while applying eyeliner, as this can distort the shape of your eye and make the application more challenging. Instead, hold your eyelid taut with your non-dominant hand and use short, controlled strokes for a precise and even line.
Applying too much pressure can also hinder your eyeliner application. Pressing too hard can cause the eyeliner to smudge or transfer onto the upper lid, resulting in a messy and unpolished look. Remember to use a light hand and build up the intensity gradually.
When it comes to the lower lash line, it’s important not to overdo it. Applying too much eyeliner on the lower lash line can make your eyes appear smaller and create an unbalanced look. Instead, opt for a more subtle approach or use an eyeshadow to softly define the lower lash line.
Never skip mascara when applying eyeliner. Mascara helps to enhance the overall eye look by adding volume, length, and definition to your lashes. It complements the eyeliner and helps to create a cohesive and polished appearance. Remember to curl your lashes beforehand for an extra fluttery effect.
After a fabulous day or night with your perfectly-applied eyeliner, don’t forget to properly remove it with a gentle eye makeup remover. Leaving eyeliner on overnight or not effectively removing it can lead to clogged pores, irritation, or even infections. Always take the time to give your eyes the care they deserve.
Lastly, avoid using expired eyeliners. Over time, eyeliners can accumulate bacteria and lose their effectiveness. Using expired eyeliners can increase the risk of eye infections or irritations. Check the expiration date and replace any outdated eyeliners in your collection.
Fixing Common Eyeliner Mistakes
Even with the best intentions and techniques, eyeliner mistakes can still happen. Fortunately, there are ways to fix them and achieve a flawless look.
If you find that your wings are uneven, don’t worry. You can easily fix this by using a cotton bud dipped in makeup remover. Gently erase and reshape the wings until they are even and symmetrical.
Smudged or messy lines can be corrected using a similar technique. Wet a cotton bud or a small, precise makeup brush with eye makeup remover or water and carefully clean up any smudges or mistakes. Make sure to be gentle to avoid disturbing the rest of your eye makeup.
For more substantial mistakes, using concealer can be a game-changer. With a small concealer brush, apply a thin layer of concealer to clean up and sharpen any irregularities. This technique will help create clean and precise lines.
If you notice that one eyeliner line is thicker than the other, don’t panic. Simply take a clean, angled brush and a matte eyeshadow in a similar shade to your eyeliner. Use the eyeshadow to add volume to the thinner line, making it match the thicker line. This quick fix will restore balance and symmetry to your liner.
A crooked or off-center line can be fixed by using a similar technique as the uneven wings. Use a cotton bud dipped in eye makeup remover or water to gently erase and readjust the line until it is straight and aligned with your eyes.
Removing excessive eyeliner can be easily done with the help of a cotton bud or a clean brush. Wet the bud or brush with eye makeup remover and carefully remove any excess eyeliner. Be patient and gentle while doing this to avoid smudging or removing any other makeup.
Enhancing Different Eye Shapes
Different eye shapes require different approaches when it comes to eyeliner application. Here are some tips to enhance various eye shapes:
- Almond-Shaped Eyes: Almond-shaped eyes are naturally versatile and can pull off various eyeliner looks. Experiment with both thin and thick lines to find what suits your style. Smoky eyeliner and cat-eye looks can beautifully enhance the shape of almond eyes.
- Round Eyes: To elongate the appearance of round eyes, opt for thin lines that follow the shape of your lash line. Avoid thick lines that can make eyes appear smaller. Experiment with winged eyeliner looks to create the illusion of an elongated eye shape.
- Hooded Eyes: Hooded eyes often have a fold of skin that covers the crease. To emphasize the eyelid, apply eyeliner slightly above the fold and extend it outward. This technique will create the appearance of a larger and more defined lid space.
- Close-set Eyes: For close-set eyes, focus on applying eyeliner on the outer corners to create the illusion of more space between the eyes. Avoid applying eyeliner on the inner corners as it can make the eyes appear even closer together.
- Wide-set Eyes: To balance out wide-set eyes, apply eyeliner from the inner corners towards the outer corners of the eyes. This technique will create the illusion of the eyes appearing closer together.
- Upturned Eyes: Emphasize the natural lift of upturned eyes by focusing your eyeliner on the outer corners. Extend the line slightly upwards to enhance the uplifted shape.
- Downturned Eyes: To counteract the downward slant of downturned eyes, apply eyeliner starting from the inner corners and gradually thicken the line as you move towards the outer corners. This technique will create the illusion of a lifted eye shape.
- Monolid Eyes: Monolid eyes typically lack a visible crease. To add depth and definition, use a thin line of eyeliner along the lash line and gradually thicken it towards the outer corners. Experiment with smoky liner and cat-eye looks to enhance the natural shape.
Experiment with these techniques to enhance your specific eye shape and discover what works best for you.
Tips for Different Eyeliner Styles
The world of eyeliner offers a plethora of styles to suit various preferences and occasions. Here are some popular eyeliner styles and tips for achieving them:
- Classic Winged Eyeliner: The classic winged eyeliner style involves creating a clean and sharp line along the upper lash line and extending it outwards into a wing or flick. Start by drawing a thin line from the inner corner of your eye to the outer corner, gradually thickening it as you go. Then, draw a line from the outer corner, angling it upwards towards your brow bone. Connect the two lines, adjusting the length and angle to suit your desired wing shape.
- Double Winged Eyeliner: Double winged eyeliner adds a unique twist to the classic winged look by adding a second wing along the lower lash line, meeting the upper wing at the outer corner. Start by creating your upper wing as you would for the classic winged eyeliner. Then, from the outer corner of your eye, draw a line along the lower lash line towards the outer corner. Connect the line to the upper wing, creating a triangular shape.
- Graphic Eyeliner: Graphic eyeliner involves creating bold and artistic designs using eyeliner. This style allows for creativity and experimentation, from geometric shapes to intricate patterns. Use a liquid eyeliner or a gel eyeliner with a fine brush to create precise lines and shapes. Let your imagination run wild and have fun with different graphic designs.
- Smokey Eyeliner: Smokey eyeliner creates a sultry and smoldering look by softening the lines and blending the eyeliner with eyeshadow. Start by applying eyeliner along the upper and lower lash lines, creating a thick line. Then, using a smudging brush or a small blending brush, blend the eyeliner upwards towards the crease. Apply a complementary eyeshadow shade over the blended eyeliner to create a smoky effect.
- Tightlining: Tightlining involves applying eyeliner to the upper waterline, filling in the gaps between the lashes to create an illusion of fuller lashes and a defined lash line. Use a waterproof eyeliner pencil or a gel eyeliner with a small brush to carefully line the upper waterline. This technique adds subtle definition and depth to the eyes.
- Waterline Eyeliner: The waterline is the inner rim of the eyelid. Applying eyeliner to the waterline can create a variety of looks, from enhancing the size of the eyes to intensifying the makeup. Use a waterproof eyeliner pencil or a gel eyeliner to carefully line the waterline. Avoid applying too much product to prevent smudging or irritation.
- Colored Eyeliner: Colored eyeliner adds a playful and creative touch to your makeup look. Experiment with different colored eyeliners to match or contrast your eye color and outfit. Choose a formula and shade that complements your skin tone and eye color, and apply it using the techniques mentioned previously.
- Glitter Eyeliner: Glitter eyeliner is perfect for special occasions or when you want to add some sparkle to your look. Use a glitter eyeliner in a shade of your choice and apply it along the upper lash line or as an accent to your regular eyeliner. Experiment with different glitter sizes and shades to achieve the desired effect.
- Nude Eyeliner: Nude eyeliner is a versatile option that can brighten and enlarge the eyes. Choose a nude or flesh-toned eyeliner pencil or gel eyeliner and apply it to the lower waterline or the inner corners of the eyes. This technique creates an open and awake appearance, making it a go-to choice for a natural and fresh look.
- Dramatic Winged Eyeliner: For a dramatic and bold look, opt for an exaggerated winged eyeliner. Start by creating a thick and elongated wing at the outer corner of your eye. Extend the wing further than usual, creating a dramatic and eye-catching shape. Connect the wing to the upper lash line, thickening the line as you go.
Experiment with different eyeliner styles and find the ones that suit your personal style and the occasion you’re attending.
Eyeliner Maintenance
To ensure your eyeliner stays flawless throughout the day, there are a few maintenance tips to keep in mind.
To avoid eyeliner transfer onto the upper lid, set your eyeliner with eyeshadow. After applying your eyeliner, take a small angled brush or a cotton bud and gently pat a matching eyeshadow shade over the liner. This technique helps to set the liner and prevents it from smudging or transferring.
If you’re prone to smudging, using a setting spray can help prolong the wear of your eyeliner. After applying your eyeliner, hold the setting spray a few inches away from your face and mist it over your eye area. This will lock in your eyeliner and help prevent smudging.
Throughout the day, it’s a good idea to carry your eyeliner and a small brush or cotton bud for any necessary touch-ups. This way, you can fix any smudges or fading that may occur, ensuring your eyeliner stays fresh and flawless.
When it’s time to remove your eyeliner, make sure to do it gently to avoid rubbing or irritating the delicate skin around your eyes. Use a gentle eye makeup remover and a cotton pad or a clean cloth to wipe away the eyeliner. Avoid aggressive rubbing or pulling, as this can cause redness or irritation.
Properly storing your eyeliners is also essential to maintain their quality and prolong their lifespan. Keep your eyeliners capped tightly when not in use to prevent them from drying out or becoming contaminated. Additionally, store them in a cool and dry place to avoid exposure to excessive heat or humidity.
Lastly, remember to clean and sharpen your eyeliners regularly. This helps remove any bacteria or accumulated product, ensuring a smooth and even application. Use a gentle makeup brush cleaner or a mixture of warm water and mild soap to clean your pencil eyeliners. For gel or liquid eyeliners, wipe the applicator or brush clean with a tissue or a clean cloth. Sharpen your pencil eyeliners with a sharpener to maintain a precise and sharp tip.
Choosing the Right Tools
Having the right tools is essential for achieving a flawless eyeliner application. Here are some common eyeliner tools and their pros and cons:
- Different Types of Eyeliner Brushes: Eyeliner brushes come in various shapes and sizes, each designed for different liner styles and techniques. Angled brushes provide precision and control, making them perfect for creating winged liner looks. A fine-pointed brush gives you more control when creating thin and precise lines. Experiment with different brushes to find the ones that suit your desired application and style.
- Pencil Eyeliners: Pencil eyeliners are a popular choice for their ease of use and portability. They typically come in retractable or sharpenable forms, allowing for convenient application. Pencil eyeliners are great for beginners as they provide more control and result in a softer, smudged look. However, they may not offer the same precision and longevity as other types of eyeliners.
- Liquid Eyeliners: Liquid eyeliners are known for their intense pigmentation and long-lasting formula. They often come with a fine tip brush or a felt tip applicator, allowing for precise and sharp lines. Liquid eyeliners work best for creating bold, dramatic looks, but they require a steady hand and more practice to master.
- Gel Eyeliners: Gel eyeliners offer a creamy formula that glides on smoothly and dries to a matte or satin finish. They often come in a pot or a tube with a brush or an applicator. Gel eyeliners are versatile and can be easily blended or smudged for a smoky effect. They are also long-lasting and offer more control than liquid eyeliners. However, they require a separate brush for application and may take longer to dry.
- Felt Tip Eyeliners: Felt tip eyeliners combine the precision of a liquid liner with the ease of use of a marker. They often have a soft, flexible tip that allows for easy and smooth application. Felt tip eyeliners are great for beginners and those who prefer a quick and mess-free application. However, they may not offer the same level of intensity as liquid or gel eyeliners.
- Eyeliner Pens: Eyeliner pens are similar to felt tip eyeliners but usually have a firmer tip. They provide control and ease of application and are a popular choice for creating precise and sharp lines. Eyeliner pens are suitable for both beginners and experienced users due to their user-friendly design. However, like felt tip eyeliners, they may not offer as much intensity as other types of eyeliners.
- Eyeliner Stamps: Eyeliner stamps are a handy tool for achieving perfect winged liner looks. They come with a stamp on one end and an eyeliner pen or brush on the other. Simply stamp the wing on the outer corner of your eye and connect it to your eyeliner for a seamless and symmetrical look. Eyeliner stamps are great for those who struggle with freehand winged liner, but they may require some practice to get the positioning right.
- Winged Liner Stencils: Winged liner stencils are another tool that can assist in achieving an even and symmetrical winged liner look. These stencils usually come in a variety of shapes and sizes, allowing you to choose the wing shape that suits your style. Place the stencil on your eyelid and fill in the outline with your preferred eyeliner. Winged liner stencils are helpful for beginners or anyone who wants a foolproof way to create winged liner looks.
Experiment with different tools to find your preferred method of application and achieve the desired eyeliner look.
Eyeliner Techniques for Beginners
If you’re new to eyeliner or looking to brush up on your skills, here are some beginner-friendly techniques to try:
- Basic Line Technique: The basic line technique is the foundation for many eyeliner styles. Start by drawing a thin line as close to your upper lash line as possible, starting from the inner corner and gradually thickening it as you move towards the outer corner. This technique provides a simple yet impactful look.
- Dotting Technique: The dotting technique is perfect for those who struggle with creating a straight line. Instead of attempting to draw a continuous line, start by placing small dots along your upper lash line. Then, connect the dots using short strokes to create a smooth line. This technique allows for more precision and control.
- Tightlining Technique: Tightlining involves lining the upper waterline to create the illusion of fuller lashes and a defined lash line. Gently lift your upper lid and use a pencil eyeliner or a gel eyeliner to apply color directly to the waterline, filling in the gaps between the lashes. This technique adds subtle definition without creating a heavy eyeliner look.
- Smudging Technique: The smudging technique is ideal for achieving a soft, smoky look. Start by applying eyeliner along your upper lash line, creating a thin line. Then, use a smudging brush or a small blending brush to gently blend and smudge the eyeliner upwards towards the crease. This technique creates a diffused and sultry effect.
- Winged Liner Technique: Winged liner is a classic and versatile style. Start by drawing a thin line along your upper lash line, gradually thickening it as you approach the outer corner. Then, create a small flick or wing extending upwards and slightly outwards from the outer corner. Connect the wing to the line, adjusting the angle and length to suit your desired look.
- Mascara-Liner Technique: The mascara-liner technique combines the application of mascara and eyeliner in one step. Start by applying mascara to your upper lashes, wiggling the wand at the base of your lashes to deposit color. Then, use the mascara wand to lightly press against the base of your lashes, transferring color to create the illusion of eyeliner. This technique provides a more natural and defined look.
- Multiple Line Technique: The multiple line technique is a fun and creative way to add dimension to your eyeliner look. Start by drawing a thin line along your upper lash line. Then, experiment by adding additional lines in different angles or lengths, creating a stacked or layered effect. This technique allows for customization and unique looks.
- Color Blocking Technique: Color blocking involves using different colored eyeliners to create a bold and artistic look. Start by choosing two or more complementary eyeliners in contrasting colors. Apply one color to the outer half of your upper lash line, starting from the outer corner and extending towards the center. Then, apply the other color to the inner half, starting from the inner corner and connecting to the center. This technique creates a striking and eye-catching effect.
- Gradient Liner Technique: The gradient liner technique adds dimension and depth to your eyeliner look. Start by applying a lighter-colored eyeliner to the inner corner of your eye and a darker-colored eyeliner to the outer corner. Then, using a smudging brush or a small blending brush, gently blend the two colors together along the lash line. This technique creates a gradient or ombré effect.
- Reverse Liner Technique: The reverse liner technique involves applying eyeliner to the lower lash line instead of the upper lash line. Start by drawing a thin line along your lower lash line, gradually thickening it towards the outer corner. This technique can create a unique and edgy look, making your eyes stand out.
Remember that practice makes perfect, so don’t be discouraged if your initial attempts aren’t flawless. With time and patience, you’ll become more confident and skilled in creating your desired eyeliner look.
Eyeliner is a versatile and powerful tool for enhancing your eyes and creating various makeup looks. By choosing the right eyeliner for your eye shape, prepping your eyes properly, and applying eyeliner with precision and care, you can achieve a flawless and stunning eyeliner look. Remember to follow the dos and avoid the don’ts, and don’t be afraid to experiment with different techniques and styles to find what suits you best. With practice, patience, and the right tools, you’ll become a master of eyeliner and rock a flawless look every time.