Are you tired of your eyeliner smudging or looking uneven throughout the day? Look no further! In this article, you will learn the secrets to achieving the perfect everyday classic eyeliner look. From tips on choosing the right eyeliner to mastering the technique for a flawless application, we’ve got you covered. Say goodbye to smudged lines and hello to a stunning, long-lasting eyeliner look that will effortlessly elevate your everyday makeup routine.

Choosing the Right Eyeliner
Consider your eye shape
When choosing the right eyeliner, it’s important to consider your eye shape. Different eye shapes require different techniques to enhance their beauty. For example, if you have almond-shaped eyes, you can experiment with various eyeliner styles, from thin lines to bold wings. On the other hand, if you have round eyes, you might want to elongate and uplift them with a winged eyeliner. By understanding your eye shape and its unique features, you can choose the most flattering eyeliner style.
Choose the right type of eyeliner
There are various types of eyeliners available in the market, each with its own pros and cons. Pencil eyeliners are a great option for beginners as they are easy to control and blend. Gel eyeliners provide a smooth and precise application, ideal for creating winged looks or intense lines. Liquid eyeliners offer a bold and long-lasting finish, perfect for creating sharp winged eyeliner styles. Play around with different types to find the one that suits your preferences and desired effect.
Decide on the color
Eyeliner doesn’t have to be limited to basic black. Experimenting with different colors can add a fun and unique touch to your everyday makeup look. If you have fair skin, brown or navy eyeliners can be softer alternatives to black. For a more daring look, consider trying out vibrant colors like green, purple, or metallic shades. Choose a color that complements your eye color and complexion, and don’t be afraid to get creative with your eyeliner choices.
Preparing Your Eyes
Start with clean and moisturized skin
Before applying eyeliner, make sure your eye area is clean and moisturized. Remove any makeup or residue from the previous day using a gentle makeup remover or micellar water. Once the area is clean, apply a lightweight eye cream or moisturizer to hydrate and prep your skin. This will create a smooth canvas for your eyeliner application and prevent any dryness or flakiness.
Apply an eye primer
To ensure your eyeliner stays in place all day long, apply an eye primer before starting your makeup. Eye primers help to create a smooth base, minimize creasing, and enhance the longevity of your eyeliner. Apply a small amount of primer to your eyelids and gently blend it in with your fingertips. Allow the primer to set for a few seconds before moving on to the next step.
Use a concealer or eyeshadow base
For a more vibrant and long-lasting eyeliner look, consider using a concealer or an eyeshadow base on your eyelids. Concealers can help to neutralize any discoloration or veins on your eyelids, providing a blank canvas for your eyeliner. Apply a small amount of concealer or eyeshadow base and blend it evenly across your lids using a brush or your fingertips. This will help to intensify the color and ensure your eyeliner stays in place throughout the day.
Tools and Techniques
Pick your eyeliner tool
Choosing the right eyeliner tool is crucial for achieving the perfect eyeliner look. Some popular options include pencil liners, gel liners, liquid liners, and even eyeshadow or angled brushes. Pencil liners are great for creating soft and smudged looks or tightlining your lashes. Gel liners offer more control and are perfect for creating precise lines or winged looks. Liquid liners give a bolder and more defined finish, ideal for creating sharp wings or graphic styles. Experiment with different tools to find the one that suits your preferred technique and comfort level.
Master different eyeliner techniques
Once you have chosen your preferred eyeliner tool, it’s essential to master different eyeliner techniques to achieve a variety of looks. The basic techniques include tightlining, where you apply eyeliner along the upper waterline to define your lashes, and classic line, where you draw a thin or thick line along the lash line. Other popular techniques include winged eyeliner, which creates a dramatic flair, and double-winged liner, which adds a unique twist to the classic wing. Practice these techniques to find the ones that enhance your eye shape and suit your personal style.
Experiment with different strokes
Don’t limit yourself to just one stroke when applying eyeliner. Experiment with different strokes to achieve various effects. A thin and delicate stroke can create a natural and subtle look, while a thicker and bolder stroke can add drama and intensity. You can also try blending the eyeliner or smudging it slightly to achieve a smoky effect. By playing around with different strokes, you can customize your eyeliner look to suit any occasion or mood.

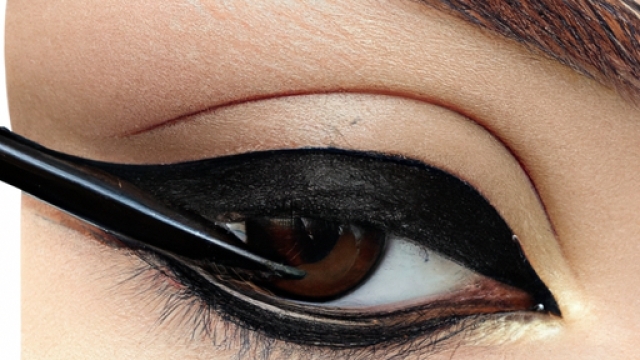
Creating the Perfect Winged Eyeliner
Mark the angles
Creating a perfect winged eyeliner requires precise angles. Start by marking the angles with a light hand using your eyeliner tool. Imagine a straight line from the outer corner of your eye towards the end of your brow. This will be the base of your wing. Then, draw a line from the outer corner of your eye towards the center of your eyelid, just above your lash line. This will guide the shape of your wing.
Create the wing outline
Using the angles you’ve marked, start creating the outline of your wing. Begin from the outer corner of your eye and draw a diagonal line towards the end of your brow, following the angle you marked earlier. Then, connect the tip of the wing back towards the center of your lash line, forming a triangular shape. Fill in the outline with your eyeliner, ensuring a smooth and even application.
Connect the wing to the lash line
To complete your winged eyeliner look, connect the winged portion to your lash line. Start from the inner corner of your eye and draw a thin line along your lash line, gradually thickening it towards the outer corner. Once you reach the point where your wing begins, connect the line with the wing, ensuring a seamless transition. Fill in any gaps and make any necessary touch-ups to achieve a flawless winged eyeliner.
Achieving a Subtle Lash Line
Apply eyeliner close to the lash line
For a subtle and natural lash line, apply your eyeliner as close to the roots of your lashes as possible. This will create the illusion of fuller lashes and define your eyes without overpowering your overall look. Use short, feathery strokes to ensure a precise and seamless application. Avoid applying a thick line, as it can make your eyes appear smaller or create a heavy effect.
Opt for a thin and precise line
Achieving a subtle lash line often involves using a thin and precise line. Choose an eyeliner tool that allows for precise application, such as a fine-tipped pencil liner or a liquid liner with a thin brush. Start from the inner corner of your eye and draw a thin line along your upper lash line, gradually increasing the thickness towards the outer corner if desired. Remember to keep the line as close to the roots of your lashes as possible for a seamless look.
Avoid smudging or uneven application
To maintain a subtle lash line, it’s essential to avoid smudging or uneven application. If you have oily eyelids or find that your eyeliner tends to smudge throughout the day, consider using a waterproof or long-wearing formula. Additionally, make sure your eyelids are clean and free of any excess oils or moisturizers before applying your liner. A smooth and dry surface will help your eyeliner adhere better and prevent any unwanted smudging.
Enhancing Your Waterline
Use a waterproof eyeliner
When enhancing your waterline, which is the inner rim of your lower eyelid, it’s important to use a waterproof eyeliner. The waterline is often wet due to tear production and natural eye moisture, so regular eyeliners may smudge or fade quickly. Waterproof eyeliners are specifically designed to withstand moisture, ensuring a long-lasting and smudge-proof look throughout the day.
Apply the eyeliner to your waterline
To enhance your waterline, gently lift your lower eyelid by pulling it downwards. This will expose the inner rim, making it easier to apply your eyeliner. Using your chosen waterproof eyeliner, carefully trace the line of your waterline from the inner corner to the outer corner of your eye. Take your time and use short, controlled strokes for a precise application. As always, be gentle to avoid any discomfort or irritation.
Avoid irritating the eyes
When applying eyeliner to your waterline, it’s important to avoid causing any irritation to your eyes. Ensure that your eyeliner pencil or brush is clean and free of any product buildup or bacteria. Avoid pressing too hard against your waterline, as this can cause discomfort or even injury. If you experience any stinging or irritation after applying eyeliner to your waterline, remove it immediately and refrain from using it in that area in the future.
Perfecting the Cat Eye Look
Extend the upper lash line
The cat eye look is a classic and glamorous eyeliner style that adds a touch of drama and sophistication to any makeup look. To achieve this look, start by extending your upper lash line towards the outer corner of your eye. Use a fine-tipped eyeliner tool, such as a liquid liner or a gel liner with a pointed brush, for precise application. Start from the inner corner of your eye and gradually thicken the line as you reach the outer corner.
Create a flick at the outer corner
Once you’ve extended your upper lash line, it’s time to create the signature flick at the outer corner. Imagine an invisible diagonal line extending from the outer corner of your eye towards the end of your brow. This will guide the direction and angle of your flick. Using the same eyeliner tool, draw a thin line from the outer corner towards the end of your brow, following the imaginary line you just drew. The length and angle of the flick can be adjusted based on personal preference and eye shape.
Thicken the line gradually
To complete the cat eye look, gradually thicken the line as you move towards the inner corner of your eye. Start from where the flick ends and draw a thin line along your upper lash line, getting thicker towards the inner corner. Ensure a smooth and consistent line by using short, controlled strokes. In the end, you should have a bold and elongated eyeliner look that beautifully accentuates your eyes.
Smoky and Smudged Eyeliner
Choose a smudgable eyeliner formula
Creating a smoky and smudged eyeliner look requires using an eyeliner formula that is specifically designed for blending. Look for eyeliners labeled as “smudgable” or “smoky” to ensure they have the right texture and consistency. Gel eyeliners, kohl pencils, or creamy eyeshadow sticks are great options for achieving a smudged look. These formulas are softer and easier to blend, allowing you to create a sultry and smoky effect.
Blend the liner with a smudging brush
To achieve the smoky effect, you’ll need a smudging brush or a dome-shaped eyeshadow brush. After applying your eyeliner, use the smudging brush to gently blend and diffuse the liner along your lash line. Work in small circular motions or back and forth to soften the edges and create a seamless transition of color. Concentrate the blending towards the outer corners for a more intensified smoky effect or extend it towards the crease for a more dramatic look.
Add depth with smoky eyeshadow
To intensify the smoky eyeliner look, consider adding depth with smoky eyeshadow. Choose a shade that complements your eyeliner color and gently apply it on top of the eyeliner, focusing on the outer corners and along the lower lash line. Use a fluffy blending brush to evenly distribute the eyeshadow and blend it seamlessly with the liner. This will add dimension and create a gradient effect, making your smoky eyeliner look even more stunning.
Setting and Longevity
Set your eyeliner with powder or shadow
For a long-lasting and smudge-proof eyeliner, set it with a powder eyeshadow in a matching shade. Using a small, angled brush, gently press the eyeshadow on top of your eyeliner, focusing on the areas where it tends to smudge or fade. This will create an extra barrier and lock in the eyeliner, ensuring it stays in place throughout the day. Additionally, setting your eyeliner with a powder can help intensify the color and prevent any transfer or creasing.
Opt for long-wearing and waterproof formulas
To ensure the longevity of your eyeliner, opt for long-wearing and waterproof formulas. These formulas are designed to withstand heat, humidity, and natural oils, making them ideal for all-day wear. Look for eyeliners labeled as “long-wearing” or “waterproof,” and read reviews or seek recommendations to find the ones that have proven to be reliable. Investing in high-quality, long-lasting eyeliner will save you from having to constantly touch up or reapply throughout the day.
Use a setting spray
To seal in your eyeliner and prolong its wear, consider using a setting spray. A few spritzes of setting spray after your entire makeup application, including your eyeliner, can help lock everything in place and prevent any smudging or fading. Hold the setting spray a few inches away from your face and mist it evenly, ensuring it covers your eyeliner. Allow it to dry naturally and enjoy the peace of mind knowing your eyeliner will stay intact for hours.
Fixing Mistakes and Cleaning Up
Use a clean Q-tip for smudges
Mistakes happen, especially when it comes to applying eyeliner. Fortunately, there are simple ways to fix smudges or uneven lines. One of the easiest methods is to use a clean Q-tip or a cotton swab dipped in makeup remover. Gently swipe the Q-tip over the area that needs correction, being careful not to touch the rest of your makeup. This will lift away any excess product and help you achieve a more precise and polished look.
Correct uneven lines with a concealer
If your eyeliner doesn’t turn out perfectly even, don’t worry. You can easily correct uneven lines using a concealer. Dip a small, flat brush into your preferred concealer and apply it along the flawed area. Gently blend the concealer into your skin, ensuring a seamless transition between the concealer and your foundation or eyeshadow. This will not only fix any mistakes but also give your eyeliner a more seamless and flawless appearance.
Clean up with a precision brush
For precise and detailed clean-up, you can use a precision brush dipped in makeup remover or micellar water. Choose a fine-tipped brush, such as an eyeliner brush or a lip brush, and lightly dip it in the remover. Carefully trace along the edges of your eyeliner, removing any excess or smudged product. By using a precision brush, you can precisely clean up any mistakes while ensuring the rest of your makeup remains intact.
In conclusion, achieving the perfect everyday classic eyeliner look requires careful consideration of your eye shape, choosing the right type of eyeliner, and deciding on the color that suits you best. Preparing your eyes with clean and moisturized skin, an eye primer, and a concealer or eyeshadow base sets the stage for flawless application. Mastering different eyeliner techniques, experimenting with strokes, and creating specific eyeliner styles such as the winged eyeliner, subtle lash line, cat-eye, smoky eyeliner, all contribute to achieving the desired look.
Setting the eyeliner with powder or shadow, opting for long-wearing formulas, and using a setting spray ensures its longevity throughout the day. Lastly, fixing mistakes and cleaning up any smudges or uneven lines is easily accomplished with the correct tools and techniques. With these tips and techniques at your disposal, you can confidently rock a classic eyeliner look every day.