Ever struggled with getting your eyeliner perfectly symmetrical? Look no further! This article reveals a game-changing technique: using tape to achieve flawless eyeliner symmetry. Forget the frustration of redoing your eyeliner over and over again. With this simple trick, you’ll be able to effortlessly create a flawless cat-eye or any eyeliner look you desire. Say goodbye to wonky lines and hello to perfectly symmetrical eyes!

Choosing the Right Tape
Determine the type of tape to use
When it comes to achieving perfect eyeliner symmetry with tape, it is important to choose the right type of tape. There are a few factors to consider when making this decision. One important factor is the material of the tape. Look for a gentle and flexible tape that is safe to use on the delicate skin around your eyes. Additionally, consider the transparency of the tape. It is best to opt for a clear tape that won’t interfere with your overall makeup look. By selecting the appropriate type of tape, you can ensure that it will work effectively without causing any discomfort or damage to your skin.
Consider the adhesive strength
Another crucial aspect to consider when choosing the right tape for achieving eyeliner symmetry is the adhesive strength. You want to select a tape that adheres well to your skin, but also allows for easy removal without causing any irritation or redness. Look for a tape that has a moderate adhesive strength, as one that is too strong may be difficult to remove, while one that is too weak may not stay in place properly. Strike the right balance to ensure that the tape provides the necessary support and guidance for your eyeliner application.
Choose a tape that is safe for your skin
When using tape for eyeliner symmetry, it is essential to prioritize the safety of your skin. Opt for a tape that is specifically designed for use on the skin to minimize the risk of any adverse reactions. Look for hypoallergenic and dermatologist-tested options to ensure that the tape is safe for sensitive skin. Additionally, consider any specific skin concerns you may have, such as dryness or oiliness, and choose a tape that caters to those needs. By selecting a tape that is safe for your skin, you can confidently achieve your desired eyeliner look without worrying about any negative effects.
Select a tape with a width that suits your preference
Lastly, it is important to consider the width of the tape when choosing the right one for achieving eyeliner symmetry. The width of the tape will determine the thickness of your eyeliner line, so it is a matter of personal preference. If you prefer a bold and dramatic eyeliner look, opt for a wider tape. On the other hand, if you prefer a more subtle and natural eyeliner look, a narrower tape will be more suitable. Experiment with different tape widths to find the one that best suits your individual style and desired outcome.
Preparing Your Eyelids
Cleanse your eyelids
Before applying any makeup, including eyeliner, it is essential to start with a clean canvas. Begin by thoroughly cleansing your eyelids to remove any dirt, oil, or previous makeup residue. Use a gentle cleanser or micellar water to ensure that your eyelids are completely clean and free from any impurities. This will help improve the longevity of your eyeliner and prevent any unwanted smudging or creasing.
Apply a primer
To ensure that your eyeliner stays in place and lasts throughout the day, it is important to apply a primer before applying the tape. An eyelid primer helps create a smooth and even surface on your eyelids, providing a better base for your eyeliner application. Apply a small amount of primer to your eyelids and gently blend it in using your fingertips or a brush. Allow the primer to dry before moving on to the next step.
Set your eyelids with powder
To further enhance the longevity of your eyeliner, consider setting your eyelids with a translucent or eyeshadow powder. This step will help absorb any excess oil on your eyelids and provide a matte surface for the tape and eyeliner to adhere to. Take a fluffy brush and lightly dust the powder over your eyelids, focusing on the areas where you plan to apply the tape and eyeliner. This will help prevent smudging or fading of your eyeliner throughout the day.
Draw a guideline using an eyeshadow
Before applying the tape, it can be helpful to draw a guideline on your eyelids using an eyeshadow. This will serve as a visual reference point and help you achieve symmetry in your eyeliner application. Choose an eyeshadow shade that is close to the color of your desired eyeliner, and using a brush, create a thin line along your upper lash line as a guideline. This step will make it easier to follow the tape later on and ensure that your eyeliner is even on both eyes.
Applying the Tape
Measure the desired length of tape
Once your eyelids are prepped and ready, it’s time to apply the tape for achieving eyeliner symmetry. Before cutting the tape, measure the desired length by starting from the inner corner of your eye and extending it towards the outer corner. The length of the tape will depend on your preference and the specific eyeliner look you want to achieve. Remember to measure carefully to ensure that both eyes have an equal length of tape for symmetrical eyeliner.
Cut the tape carefully
After determining the desired length of tape, carefully cut it using a pair of sharp scissors. Make sure to cut the tape in a straight line to avoid any jagged edges. A clean and precise cut will make it easier to apply the tape smoothly and accurately on your eyelids. If you are worried about cutting the tape too short or too long, it is always better to err on the side of caution and cut a slightly longer piece. You can always trim it down later if needed.
Warm up the tape with your hands
Before applying the tape to your eyelids, it can be helpful to warm it up slightly with your hands. Gently rub the tape between your fingers for a few seconds to warm it up and make it more pliable. This will help the tape adhere better to your skin and conform to the shape of your eyelids. Just make sure not to warm up the tape too much, as excessive heat can damage the adhesive or cause discomfort when applied to your skin.
Place the tape on your eyelid
Now it’s time to carefully apply the tape to your eyelids. Starting from the inner corner, align the edge of the tape with the guideline you created earlier using the eyeshadow. Slowly and gently press the tape onto your eyelid, following the natural curve and shape of your eye. Make sure the tape is taut but not too tight to avoid any discomfort. Smooth out any creases or wrinkles in the tape to ensure a flat surface for your eyeliner application.
Ensure the tape is secure and aligned
After applying the tape, take a moment to ensure that it is secure and properly aligned on both eyes. Check in the mirror and adjust the tape if necessary to achieve perfect symmetry. The tape should be firmly adhered to your eyelids, but you should still be able to move and blink comfortably. If you feel any discomfort or if the tape is too tight, gently lift and reapply it for a better fit. It’s important to have the tape in the correct position before proceeding with your eyeliner application.

Creating the Eyeliner Look
Choose the style of eyeliner you want
With the tape securely in place, it’s time to decide on the style of eyeliner you want to create. There are various eyeliner looks to choose from, including classic cat eye, dramatic winged eyeliner, double-winged eyeliner, subtle everyday eyeliner, and precise graphic eyeliner. Consider the occasion, your personal style, and the shape of your eyes when choosing the style that best suits you. It’s also a great opportunity to experiment and try out different eyeliner techniques and types to find your go-to look.
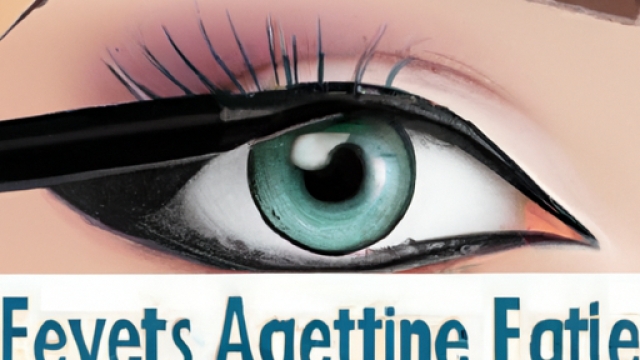
Start applying eyeliner from the inner corner
When applying eyeliner with the tape as a guide, start from the inner corner of your eye and work your way towards the outer corner. Using either a liquid liner, gel liner, or a pencil liner, carefully trace along the edge of the tape, following the natural curve of your upper lash line. Start with a thin line and gradually build up the thickness to achieve your desired intensity. Take your time and go slowly to ensure a smooth and even application.
Follow the tape as a guide
The tape will serve as your guide for creating a straight and symmetrical eyeliner line. As you continue to apply the eyeliner, follow the edge of the tape closely, using it as a reference point. Keep your hand steady and apply gentle pressure to create a smooth line. By following the tape, you can ensure that both eyes have a consistent shape and thickness in the eyeliner, resulting in a balanced and symmetrical look.
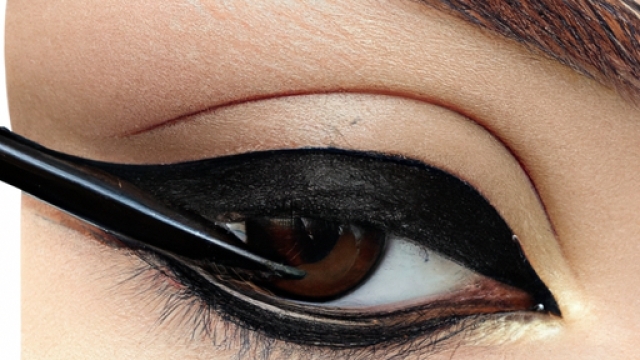
Create a wing or flick at the outer corner
If you desire a winged eyeliner look, use the tape to help create the perfect flick at the outer corner of your eye. Follow the natural angle of your lower lash line, and extend the eyeliner slightly beyond the tape to create the wing. The length and angle of the wing can be adjusted according to your preference. Take your time to carefully draw the wing, ensuring that it is even and balanced on both eyes.
Connect the wing to the rest of the eyeliner
To complete the eyeliner look, connect the wing to the rest of the eyeliner line. Carefully fill in any gaps or spaces between the wing and the tape, creating a seamless and continuous line across your upper lash line. Use short and precise strokes to ensure a smooth and controlled application. Once you have connected the wing to the rest of the eyeliner, step back and assess the overall symmetry and balance. Make any necessary adjustments before moving on to removing the tape.
Removing the Tape
Gently lift and remove the tape
Now that your eyeliner is complete, it’s time to remove the tape. Gently lift one end of the tape and slowly peel it off from your eyelid. Be careful not to pull or tug on your skin, as the eye area is delicate and sensitive. Take your time and go slowly to minimize any discomfort or redness. If you encounter any resistance when removing the tape, apply a small amount of warm water to help loosen the adhesive before attempting to remove it again.
Take your time to avoid any discomfort
Removing the tape requires patience and a gentle touch. Take your time and avoid rushing the process to prevent any discomfort or irritation. If you encounter any difficulty in removing the tape or notice any discomfort, pause and take a break. Apply a warm compress to your eyelids to help loosen the adhesive and make the removal process easier. It is important to prioritize the health and well-being of your skin, so be gentle and cautious throughout this step.
Remove any adhesive residue
After removing the tape, you may notice some adhesive residue left on your eyelids. To remove this residue, soak a cotton pad or a Q-tip in a gentle makeup remover or micellar water and gently swipe it over the affected areas. The adhesive residue should come off easily without harsh scrubbing. Ensure that all residue is removed to prevent any irritation or clogged pores. Once the residue is gone, take a moment to admire your perfectly symmetrical eyeliner.
Cleanse your eyelids once again
After removing the tape and any adhesive residue, it is important to cleanse your eyelids once again to ensure that they are clean and free from any makeup or product residue. Use a gentle cleanser or a micellar water to thoroughly cleanse your eyelids. This step will help soothe and refresh your skin after the tape application and ensure that your eyelids are ready for the next step in your makeup routine or for a fresh face.
Apply moisturizer or soothing eye cream
To complete the process, apply a moisturizer or a soothing eye cream to nourish and hydrate your eyelids. This step will help replenish any moisture that may have been lost during the tape application and removal process. Look for a lightweight and gentle formula that is specifically designed for the delicate eye area. Gently massage the moisturizer or eye cream into your skin using your fingertips, and allow it to fully absorb before applying any further makeup.
Common Mistakes to Avoid
Using tape with excessive adhesive
One common mistake to avoid when using tape for achieving eyeliner symmetry is using tape with excessive adhesive. While it is important for the tape to stick to your skin, excessive adhesive can make the removal process difficult and potentially cause irritation or redness. Choose a tape with a moderate adhesive strength to strike the right balance between adherence and comfort.
Not cleaning and priming the eyelids
Failing to properly clean and prime your eyelids before applying the tape can lead to a less-than-ideal outcome. Cleaning your eyelids ensures that there are no barriers to the adhesive and allows for a stronger bond. Additionally, applying a primer creates a smooth and even surface for the tape and eyeliner to adhere to. Don’t skip these important preparation steps to achieve the best results.
Cutting the tape too short or long
Another common mistake is cutting the tape either too short or too long. Cutting the tape too short can result in an uneven eyeliner line, while cutting it too long can make it difficult to create a winged eyeliner look. Measure carefully and make small adjustments as needed to ensure that both eyes have the same length of tape and achieve symmetrical eyeliner.
Pressing too firmly, distorting the eyeliner shape
When applying the tape, it is important to press it onto your eyelid firmly enough to ensure it stays in place, but not so firmly that it distorts the shape of your eyeliner. Pressing too firmly can cause the tape to stretch and change the shape, resulting in an uneven eyeliner line. Use a gentle touch and ensure that the tape is secure, yet aligned with your desired eyeliner shape.
Neglecting to remove adhesive residue
After removing the tape, it is crucial to check for any adhesive residue left on your eyelids. Neglecting to remove this residue can lead to discomfort, irritation, or potential clogging of your pores. Take the time to thoroughly cleanse your eyelids and remove any adhesive residue before proceeding with the rest of your makeup routine. This step ensures a clean and fresh canvas for your eyes.
Tips for Achieving Perfect Symmetry
Practice on one eye at a time
To achieve perfect symmetry in your eyeliner application, it is recommended to practice on one eye at a time. This allows you to focus on each eye separately and make any necessary adjustments for symmetry. Start with your dominant hand and master the technique on one eye before moving on to the other. With practice, you’ll become more comfortable and confident in achieving symmetrical eyeliner.
Use a mirror to check for symmetry
A mirror is a valuable tool when aiming for perfect symmetry in your eyeliner. After applying the eyeliner on one eye, step back and look into the mirror to check for any differences or imbalances. Pay attention to the shape, thickness, and length of your eyeliner. Adjust as needed before proceeding to the next eye. The mirror provides a helpful perspective to ensure that your eyeliner is even and balanced on both eyes.
Make small adjustments with a cotton swab
If you notice any discrepancies between the eyeliner on both eyes, don’t fret. Small adjustments can be made to achieve perfect symmetry. Dip a cotton swab in makeup remover or micellar water and gently correct any uneven lines or shapes. Take your time and make precise adjustments until both eyes are symmetrical. This technique allows for fine-tuning and ensures a polished and balanced look.
Try different eyeliner techniques and types
Achieving perfect symmetry in your eyeliner doesn’t mean sticking to just one technique or type of eyeliner. Feel free to experiment with different styles, such as a classic cat eye, a winged eyeliner, or a subtle everyday look. Additionally, try different types of eyeliners, such as liquid liners, gel liners, or pencil liners, to find the one that works best for you in terms of application and desired outcome. Embrace the opportunity to explore your creativity and find your unique eyeliner style.
Take breaks and avoid rushing the process
Achieving perfect symmetry in your eyeliner takes time and patience. It’s important to take breaks and avoid rushing the process. Rushing can lead to mistakes and uneven results. Allow yourself enough time to carefully apply the tape, eyeliner, and make any necessary adjustments. Taking breaks between steps or even between eyes can help you refresh your focus and ensure that each eye receives the attention it deserves.
Alternative: Eyeliner Stencils
Explore the option of eyeliner stencils
If using tape for achieving eyeliner symmetry feels challenging or uncomfortable, another option to consider is eyeliner stencils. Eyeliner stencils are pre-cut templates that can help you create precise and symmetrical eyeliner looks without the need for tape. They offer a convenient and foolproof method for achieving perfect symmetry, especially for those who may struggle with freehand eyeliner application.
Find a stencil with your desired eyeliner shape
When selecting eyeliner stencils, look for a stencil that matches your desired eyeliner shape. Whether you want a classic cat eye, a winged eyeliner, or any other specific shape, there are various stencil options available. Take your time to find a stencil that suits your style and preferences. It’s also helpful to choose a stencil made from a flexible material that adheres well to your eyelids and allows for easy and precise application.
Position the stencil on your eyelid
To use the eyeliner stencil, position it carefully on your eyelid, ensuring that it aligns with your lash line and desired shape. Hold the stencil firmly against your eyelid but be cautious not to apply too much pressure that could cause discomfort or distortion. The stencil acts as a guide, allowing you to trace along its edges and create a symmetrical and uniform eyeliner line.
Fill in the stencil with eyeliner
Once the stencil is in place, fill it in with your preferred eyeliner product. You can use a liquid liner, gel liner, or pencil liner, depending on your personal preference and the desired outcome. Carefully trace along the edges of the stencil, keeping your hand steady for a precise application. Take your time and make any necessary adjustments as you go along.
Remove the stencil carefully
After you have filled in the stencil with eyeliner, gently remove the stencil from your eyelid. Take care not to smudge or disturb the eyeliner as you do this. If there are any imperfections in the eyeliner, you can use a cotton swab or a small brush dipped in makeup remover or micellar water to correct them. Just like with tape, always remove any excess eyeliner or makeup before proceeding with the rest of your makeup routine.
Using Tape for Different Eyeliner Styles
Creating a classic cat eye
To create a classic cat eye using tape, position the tape at an angle from the outer corner of your eye towards the end of your eyebrow. The tape acts as a guide for the winged shape of the cat eye. Follow the steps outlined earlier, starting from the inner corner and gradually building up the thickness of the eyeliner towards the outer corner. Once you reach the tape, extend the line slightly diagonally to create the wing. Ensure that both eyes have symmetrical wings before removing the tape.
Achieving a dramatic winged eyeliner
For a more dramatic winged eyeliner look, position the tape at a steeper angle from the outer corner of your eye towards your temple. This will create a more elongated and pronounced wing. Follow the steps for applying eyeliner as before, ensuring that the wing extends beyond the tape at the outer corner. The tape will help you maintain a sharp and precise winged shape on both eyes.
Experimenting with double-winged eyeliner
If you’re feeling bold and adventurous, double-winged eyeliner can elevate your eye makeup look. To achieve this style using tape, position two parallel pieces of tape at the desired angle and distance apart from each other. This will create the guidelines for both the upper and lower wings. Follow the steps for applying eyeliner, starting with the upper wing first and connecting it to the rest of the eyeliner line. Then, carefully apply eyeliner to the lower wing, ensuring that both wings are symmetrical. Remove the tape to reveal your stunning double-winged eyeliner.
Applying eyeliner for a subtle everyday look
If you prefer a more subtle and natural eyeliner look for everyday wear, tape can still be a helpful tool. Position the tape at a slight angle from the outer corner towards the edge of your eye socket. This will create a soft and gentle wing. Apply eyeliner along your upper lash line, keeping the line thin and close to your lashes. The tape will help guide the shape and keep the eyeliner symmetrical on both eyes. Remove the tape and enjoy your effortless everyday eyeliner look.
Using tape for precise graphic eyeliner
For those who enjoy experimenting with bold and creative eyeliner looks, tape can be an invaluable tool for achieving precise graphic lines. Position the tape in the desired shape and angle, whether it’s a geometric design, a graphic wing, or any other unique creation. Apply eyeliner carefully along the edges of the tape to create sharp and defined lines. Once you’re satisfied with the eyeliner, remove the tape to reveal your striking and precise graphic eyeliner.
Final Thoughts
Achieving perfect eyeliner symmetry with tape or stencils doesn’t have to be a daunting task. By following the steps outlined in this guide and taking into account the tips and suggestions provided, you can confidently create symmetrical and flawless eyeliner looks. Remember to choose the right tape or stencils for your needs, prepare your eyelids properly, and take your time to ensure accuracy and comfort. Experiment, practice, and embrace your unique eyeliner style. With perseverance and a friendly tone, you will master the art of perfect eyeliner symmetry.