To achieve a stunning cut crease look, embrace the artistry of cut crease eyeshadow. This technique involves creating a defined line on the crease of your eyelid, resulting in a bold and dramatic effect. By carefully applying contrasting shades and blending them seamlessly, you can enhance the shape of your eyes and create an attention-grabbing look that is both sophisticated and eye-catching. So, get ready to elevate your makeup game and master the art of the cut crease for a striking and flawless appearance.

Preparation
Before diving into creating a stunning cut crease look, it’s important to make sure you have the right tools. A fluffy blending brush, a smaller tapered brush, and a flat shader brush will be your best friends for this makeup technique. Additionally, choose eyeshadow shades that complement each other and align with the look you want to achieve.
To ensure your eyeshadow stays vibrant and lasts all day, start by priming your eyelids. A good eyeshadow primer will create a smooth canvas for your eyeshadow and help prevent creasing. Simply apply a small amount to your eyelids and gently blend it in with your fingers or a brush.
To set a base color, choose a shade that matches your skin tone or a light neutral shade. Apply this shade all over your eyelids, from your lash line to your brow bone. This will provide a smooth and even base for the rest of your eyeshadow.
Creating the Cut Crease
To create the perfect cut crease, start by mapping out your crease. Take a small blending brush with a transition shade slightly darker than your skin tone and softly sweep it into the crease area. This will help define and guide the placement of your cut crease.
Next, blend a transition shade into the crease. Choose a shade that is slightly deeper than the transition shade used earlier. Using a fluffy blending brush, blend this shade back and forth in the crease to create a seamless transition between the colors.
To really define the crease, use a darker shade. This shade should be deeper than the previous transition shade. Using a smaller tapered brush, concentrate the darker shade directly into the crease, starting from the outer corner and blending towards the center of the lid. This will add depth and dimension to your cut crease.
The next step is to cut the crease with concealer. Use a small, flat brush to carefully apply a concealer that is a few shades lighter than your skin tone to the center of your lid. Gently pat the concealer onto the lid, stopping just below the crease. This will create a blank canvas for the lid color to pop.
To set the concealer and prevent creasing, lightly dust a matching powder over the concealer. This will keep everything in place and ensure your cut crease looks flawless.
Eyeshadow Application
With the cut crease ready, it’s time to apply the lid color. Choose a shade that complements your overall look and apply it to the lid using a flat shader brush. Pat the eyeshadow onto the lid, focusing on the area where the concealer ends and blending it into the darker crease shades.
To highlight the brow bone and add a touch of brightness, choose a shimmery or matte light shade and apply it just below the arch of your brow. This will create a lifted and defined effect.
Adding depth to the outer corner will give your cut crease more dimension. Take a small amount of a darker shade and apply it to the outer V of your eye. Blend it slightly into the crease and lid color for a seamless transition.

Eyeliner and Mascara
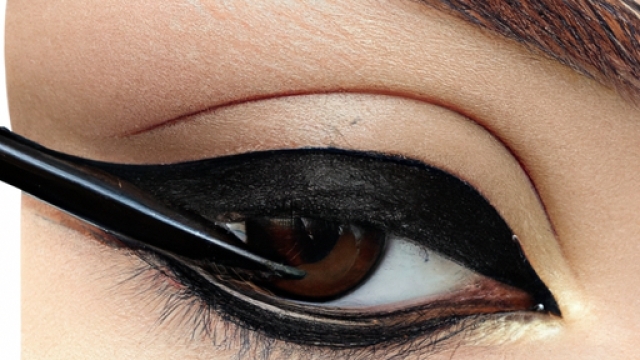
To enhance the cut crease look, draw a clean line along your upper lash line using a liquid or gel eyeliner. Start from the inner corner and gradually thicken the line as you move towards the outer corner of your eye. For a more dramatic effect, create a winged effect by extending the line slightly upwards and outwards.
To complete the look, apply mascara to your lashes. Start from the root and wiggle the wand towards the ends for maximum volume and length. Apply multiple coats for a fuller effect, making sure to separate any clumps with an eyelash comb or a clean mascara wand.
Finishing Touches
After completing your eyeshadow application, take a moment to clean up any fallout or excess product. Use a clean brush or a makeup wipe to gently remove any eyeshadow that may have fallen onto your cheeks or under your eyes. This will give you a cleaner and more polished finish.
Blend everything together with a clean blending brush. This will soften any harsh lines and ensure a seamless transition between the shades.
Take a final look and touch up any areas that may need some extra attention. Add a little more of a certain shade to intensify the look or blend out any edges that need refining.
To set your cut crease look in place, reach for a setting spray. Hold the bottle about 6-8 inches away from your face and mist lightly. This will help your eyeshadow and overall look last all day without any fading or smudging.
Variations
While the classic cut crease is stunning on its own, there are various ways to spice it up and make it your own.
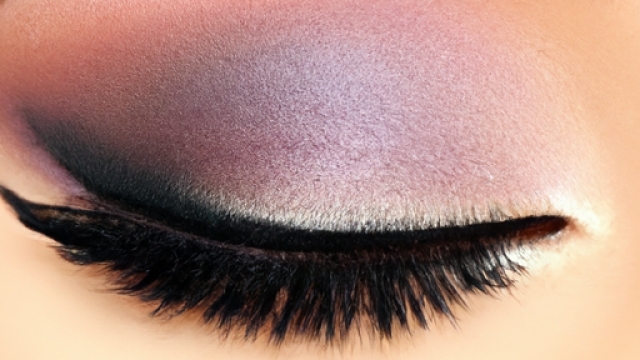
For a smokey cut crease, incorporate darker shades like blacks and deep purples into the crease and outer corner. This will create a more intense and sultry effect.
An inverted cut crease is a modern twist on the traditional cut crease. Instead of defining the crease with a darker shade, use a lighter shade and define the lid with a darker shade. This creates a striking contrast and adds a unique touch to your eye makeup.
Double cut crease is a bold and eye-catching variation. Using concealer, create a second cut crease just above the first one and apply a contrasting color to the new cut crease. This will give your eyes a multi-dimensional look.
To add some sparkle and glamour to your cut crease, try a glitter cut crease. Apply a glitter adhesive or a tacky eyeshadow base to the lid and pack on your favorite glitter shade. This will make your eyes shine and catch everyone’s attention.
Tips and Tricks
When creating a cut crease, using tape or a spoon can be a helpful trick to achieve a sharp edge. Place the edge of the tape or the handle of the spoon against the outer corner of your eye and use it as a guide to draw a precise line.
Gradually build up the intensity of your eyeshadow shades by layering and blending them. Start with lighter shades and slowly work your way into deeper and more vibrant colors. This will create a smooth gradient and prevent any harsh lines.
Blend your eyeshadow with a clean brush to ensure a polished and seamless look. This will help soften any edges and create a professional finish.
Don’t be afraid to experiment with different color combinations. Mix and match shades to create unique and eye-catching cut crease looks. Let your creativity soar and have fun with your makeup!
Common Mistakes to Avoid
One common mistake to avoid when creating a cut crease look is not using an eyeshadow primer. An eyeshadow primer helps the colors appear vibrant and prevents creasing throughout the day. It’s an essential step to achieve a long-lasting and flawless cut crease.
Another mistake is skipping the transition shade. The transition shade is crucial for creating a gradient and seamlessly blending the crease shades. Without it, your cut crease may appear harsh and incomplete.
Using too much concealer when cutting the crease can also be a pitfall. A little goes a long way, so start with a small amount and build up if needed. Too much concealer can make the lid feel heavy and cause the eyeshadow to crease or crack.
Lastly, applying too much product can result in a messy and overpowering cut crease. Start with a light hand and gradually build up the intensity and depth of your shades. This will help you maintain control over the application and ensure a more polished finish.
Inspiration and Tutorials
If you’re looking for more guidance or inspiration, YouTube tutorials can be a great resource. Many talented makeup artists share their techniques and step-by-step tutorials on creating various cut crease looks. Simply search for “cut crease tutorial” and explore the wealth of makeup inspiration available.
Social media platforms like Instagram and Pinterest are also great places to find inspiration. Follow popular makeup artists or search for specific hashtags like #cutcrease or #cutcreaselook to discover a wide range of stunning looks created by beauty enthusiasts from around the world.
Remember, practice is key when it comes to perfecting your cut crease technique. Experiment with different color combinations, tools, and styles to develop a unique cut crease look that reflects your individuality and creativity.
Conclusion
With the right tools, techniques, and a little creativity, you can achieve a stunning cut crease look that will turn heads wherever you go. Don’t be afraid to step out of your comfort zone and try new color combinations or variations.
Practice and refine your technique to become a cut crease pro. Remember, everyone’s journey is different, so allow yourself room to experiment and find what works best for you. Express your creativity and embrace the eye-catching allure of the cut crease trend.