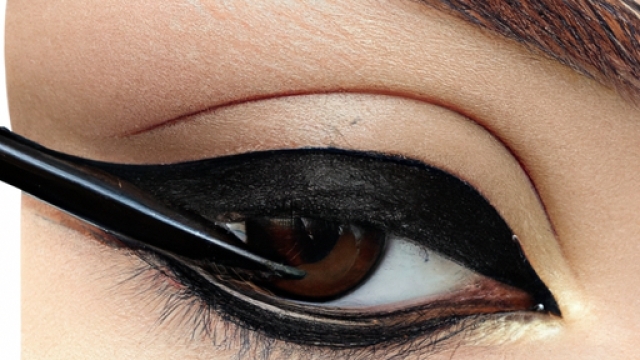
Have you ever struggled to perfect your eyeliner game? Look no further! In this article, we will explore a variety of eyeliner techniques that will beautifully enhance the size and shape of your eyes. Whether you prefer a subtle or dramatic look, these tips and tricks will help you master the art of eyeliner and achieve stunning results every time. Get ready to unleash your inner makeup artist and transform your eyes into captivating works of art!

Understanding Different Types of Eyeliner
Pencil Eyeliner
Pencil eyeliner is the most commonly used type of eyeliner. It comes in a pencil form, which makes it easy to apply. It is also smudgeable, allowing for a softer look. Pencil eyeliner is great for beginners as it provides more control and is less likely to smudge during application. It is ideal for creating a natural, everyday look.
Liquid Eyeliner
Liquid eyeliner is known for its intense pigmentation and precise application. It usually comes with a brush or felt-tip applicator, which allows for a sharp and defined line. Liquid eyeliner is perfect for creating bold, dramatic looks. However, it requires a steady hand and some practice to achieve a flawless application.
Gel Eyeliner
Gel eyeliner comes in a pot and is applied using a brush. It provides a smooth and creamy texture, making it easy to control during application. Gel eyeliner is highly pigmented and long-lasting, making it ideal for creating dramatic or graphic looks. It is also great for achieving a precise winged liner. Additionally, gel eyeliner is smudge-proof and water-resistant, making it suitable for all-day wear.
Cake Eyeliner
Cake eyeliner typically comes in a compact form and needs to be activated with water or a mixing medium before application. It is usually applied with an angled brush and offers a range of intensities depending on the amount of water used. Cake eyeliner allows for versatility as it can be applied as a thin line or built up for a more dramatic effect. It is also long-lasting and does not smudge easily.
Choosing the Right Eyeliner Shade
Matching Eyeliner to Eye Color
When choosing an eyeliner shade, it’s beneficial to consider your eye color. For blue eyes, copper, bronze, and brown shades can make your eye color pop. If you have green eyes, opt for plum, purple, or gold shades. Brown eyes can be enhanced with almost any color, but navy, charcoal, and emerald shades work particularly well. Experimenting with different shades can add depth and dimension to your eyes.
Contrasting Eyeliner for Dramatic Effect
If you’re looking to create a bold and dramatic effect, consider using contrasting eyeliner shades. For example, if you have blue eyes, try using a rich brown or black eyeliner to make your eyes stand out even more. Similarly, green eyes can be intensified with a dark purple or navy eyeliner. Brown eyes can be made more striking with a deep emerald or metallic silver liner. Contrasting eyeliner adds intrigue and draws attention to your eyes.
Neutral Eyeliner for Subtle Enhancement
For a more subtle and natural look, opt for neutral eyeliner shades. Colors such as brown, taupe, or gray can help define your eyes without overpowering them. Neutral eyeliner is perfect for everyday wear and complements any eye color. It enhances your eyes in a subtle yet beautiful way, perfect for those who prefer a more understated makeup look.
Creating a Base for Your Eyeliner
Preparing the Eyelid
Before applying eyeliner, it’s important to prepare your eyelid. Start by cleansing your eyelid thoroughly to ensure the area is free of oil or makeup residue. If needed, apply a primer specifically designed for eyelids to create a smooth and even base. Preparing your eyelid ensures that the eyeliner adheres better and lasts longer throughout the day.
Applying Eyeshadow as a Base
Another way to create a base for your eyeliner is by applying eyeshadow. Choose a shade that complements your eyeliner color and apply it all over your eyelid. The eyeshadow provides a velvety texture, making it easier to glide the eyeliner pencil or brush along the lash line. It also helps to set the eyeliner and prevent smudging or creasing.
Using Eyelid Primer
Eyelid primer is specifically designed to enhance the longevity and vibrancy of your eyeliner and eyeshadow. Apply a small amount of eyelid primer onto your eyelid and gently blend it in. The primer creates a smooth canvas for your eyeliner, ensuring it stays in place all day without creasing or fading. Additionally, eyelid primer helps to prevent your eyeliner from smudging or transferring onto the eyelid.

Enhancing Eye Size with Eyeliner
Tightlining
Tightlining is a technique where you apply eyeliner to the base of your upper lash line, right between the roots of your lashes. This creates the illusion of thicker and fuller lashes, making your eyes appear larger and more defined. To tightline, gently lift your upper eyelid and carefully apply the eyeliner along the waterline. For a more natural look, opt for a dark brown or black eyeliner.
Applying Eyeliner to the Upper Waterline
Applying eyeliner to the upper waterline can make your eyes look bigger and more awake. Simply lift your upper eyelid and gently apply the eyeliner along the waterline, taking care to stay as close to the lashes as possible. This technique adds depth to your lash line and creates the appearance of fuller lashes.
Extending the Eyeliner Beyond the Outer Corner
Creating a slight wing or extending your eyeliner beyond the outer corner of your eye can elongate and lift your eyes. Start by lining your upper lash line as usual, then extend the line slightly upward and outward. The angle and length can be adjusted to suit your desired look. This technique adds a touch of glamour and can make your eyes appear more almond-shaped.
Accentuating Eye Shape with Eyeliner
Applying Eyeliner for Almond-Shaped Eyes
If you have almond-shaped eyes, you’re in luck as almost any eyeliner style can complement your eye shape. To enhance the natural shape of your eyes, apply eyeliner along the upper lash line, starting from the inner corner and gradually thickening the line towards the outer corner. You can also apply a thin line along the lower lash line to add balance and definition.
Creating a Winged Eyeliner for Cat Eyes
Cat eyes are a classic and glamorous eyeliner style that can elongate and lift your eyes. Start by lining your upper lash line from the inner corner to the outer corner. Then, create a flick or wing by extending the line slightly upward and outward, following the natural curve of your lower lash line. Adjust the angle and length of the wing to achieve your desired look.
Enhancing Round Eyes with Eyeliner
To make round eyes appear more elongated and defined, focus on creating a winged eyeliner look. Start by lining your upper lash line, then extend the line slightly upward and outward to create a wing. This technique helps to elongate the eyes and create the illusion of a more almond-shaped eye shape. Additionally, avoid lining the lower lash line entirely to avoid closing off the eyes.
Smudging Techniques for a Softened Look
Using a Smudging Brush
To achieve a soft and smoky effect, use a smudging brush to blend the eyeliner after application. This technique creates a softer edge and diffuses the line for a more subtle look. Gently sweep the smudging brush along the eyeliner, blending it outwards. Focus on the outer corners for a smoldering effect. Smudging with a brush also helps to prevent harsh lines and ensures a more seamless application.
Smudging Eyeliner with a Q-tip
If you don’t have a smudging brush, a Q-tip can be a handy tool for smudging eyeliner. After applying the eyeliner, take a clean Q-tip and gently smudge the line by dragging it back and forth along the edge of the liner. This technique helps to soften the line and create a more diffused appearance. Be gentle to avoid removing too much product and reapply if necessary.
Using Your Fingers to Blend
In the absence of brushes or Q-tips, your fingers can be a great tool for smudging eyeliner. Simply use your ring finger or pinky finger and gently blend the eyeliner by lightly pressing and smudging along the line. The warmth of your fingers helps to soften the eyeliner and create a seamless blend. This technique works well for a softer and more natural look.
Correcting Mistakes and Achieving Symmetry
Cleaning Up Uneven Lines
If you accidentally create an uneven or crooked line, don’t worry. Use a pointed cotton swab or a thin makeup brush dipped in makeup remover to clean up the edges. Gently remove the excess eyeliner or smudge it out to create a more even line. Take your time and make small adjustments until the line appears symmetrical and smooth.
Using a Concealer to Fix Errors
Another way to correct eyeliner mistakes is by using a concealer. After applying your eyeliner, take a small concealer brush or a cotton swab and dab a small amount of concealer along the edges of the liner to create a clean and precise line. Blend the concealer carefully to avoid removing the eyeliner. This technique helps to correct any smudges or unevenness and gives a polished finish.
Using Tape for Even Winged Eyeliner
If you struggle with creating even wings or symmetrical eyeliner, tape can be a useful tool. Take a small piece of tape and place it diagonally along the outer corner of your eye, following the natural angle of your lower lash line. Use the tape as a guide to create your winged liner. Once the liner is applied, carefully remove the tape to reveal a crisp and even wing.
Creating Different Eyeliner Styles
Classic Thin Line
For a timeless and effortless look, draw a thin line of eyeliner along your upper lash line using your preferred eyeliner type. Keep the line close to the lashes for a natural appearance. This classic eyeliner style is versatile and can be worn for any occasion.
Bold and Thick Line
To make a statement, opt for a bold and thick eyeliner line. Whether you choose a pencil, liquid, gel, or cake eyeliner, apply a thicker line along your upper lash line. This style adds drama and intensity to your eyes, perfect for evening events or when you want to make a bold makeup statement.
Double Winged Eyeliner
Double winged eyeliner is a fun and unique twist on the classic winged liner. Start by creating a regular winged liner, then extend the line slightly further towards the outer corner of your eye. Connect the endpoints of both wings with a straight line along the upper lash line to create the double winged effect. This style adds extra flair and creativity to your eye makeup.
Graphic Eyeliner
For a more artistic and bold look, experiment with graphic eyeliner. This style allows you to play with shapes, lines, and negative space to create eye-catching designs. Use different eyeliner techniques to draw geometric shapes or create bold patterns along your upper lash line. Have fun and let your creativity shine with graphic eyeliner.
Tools and Techniques for Precise Application
Choosing the Right Eyeliner Brush
If you prefer using gel or cake eyeliner, selecting the right eyeliner brush is essential. Look for a thin and angled brush with firm bristles. This type of brush allows for precise application, making it easier to create precise lines and wings. Experiment with different brush sizes to find the one that works best for you.
Applying Eyeliner with a Smudge Brush
If you want to achieve a softer and smudged look, a smudge brush is a great tool to have. Use the smudge brush to blend and soften the edges of your eyeliner. The soft bristles of a smudge brush help create a smoky effect and add depth to your eye makeup. Gently sweep the brush along the eyeliner to blend it out.
Using an Angled Brush for Winged Eyeliner
When creating winged eyeliner, an angled brush can be your best friend. It allows for greater control and precision when drawing the winged line. Dip the angled brush into your preferred eyeliner formula and start by drawing a line along your upper lash line. Then, use the angle of the brush to create the wing, following the natural direction of your lower lash line.
Setting and Longevity of Eyeliner
Setting Eyeliner with Eyeshadow
To make your eyeliner last even longer, set it with eyeshadow. After applying your eyeliner, take an angled brush and gently press a matching eyeshadow shade over the liner. This technique helps to set the eyeliner and prevents it from smudging or fading throughout the day. It also adds an extra layer of intensity and definition to your eye makeup.
Using an Eyeliner Sealant
If you want your eyeliner to stay in place without smudging or transferring, consider using an eyeliner sealant. Eyeliner sealants are specially formulated to lock in your eyeliner and provide long-lasting wear. Simply apply a small amount of sealant over your eyeliner using a clean brush or the applicator provided. This will keep your liner intact and ensure it stays fresh for hours.
Tips for Long-lasting Eyeliner
To extend the longevity of your eyeliner, here are a few additional tips:
- Set your eyeliner with a matching eyeshadow to prevent smudging.
- Avoid rubbing your eyes throughout the day to minimize the chances of your eyeliner smudging or fading.
- Opt for waterproof or smudge-proof formulas if you know you’ll be in a humid or sweaty environment.
- Avoid applying eyeliner too close to the inner corners of your eyes to prevent smudging caused by natural eye moisture.
By following these tips, you can enjoy long-lasting and flawless eyeliner throughout the day.
In conclusion, mastering various eyeliner techniques can enhance your eyes and elevate your makeup looks. Whether you prefer a natural everyday style or a bold and dramatic effect, there are eyeliner styles, shades, and application techniques for everyone. Remember to choose the eyeliner type and shade that suits your preferences and eye color. Properly preparing your eyelid and creating a base for your eyeliner ensures a smooth application and longer wear. Experiment with different techniques to enhance the size and shape of your eyes, and don’t be afraid to correct any mistakes or try out various eyeliner styles. With the right tools and techniques, your eyeliner skills will be on point, leaving you with beautifully enhanced eyes.